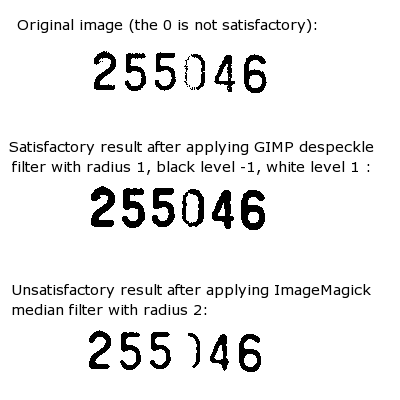
I have a program which accepts as input a black-and-white (1-bit) image of a scanned document, uses ImageMagick to crop it to a rectangle surrounding the page's serial number, and passes the cropped rectangle to an OCR program to try to identify the serial number. Now, the OCR program only succeeds about 40% of the time. The main problem seems to be that the printing tends to be a bit faint, so that there can be white patches in the numbers. So, what I am wondering is whether there is any way ImageMagick can expand the black pixels in the image in order to reduce white patches within the numbers? Or does anybody have any other suggestions?
Thanks a lot.
Tony.
Improving image quality

-
tongro
I've tried the median filter, but the trouble is that it also eliminates small black patches. I'd like to enhance the black bits but get rid of the white noise. The despeckle filter doesn't seem to have any effect.
I've played with various filters in GIMP and have got satisfactory results with its "despeckle" filter, adjusting the "white level" and "black level" settings.
Here's an example:
If that inspires any more suggestions, it would be much appreciated.
Thanks.
Tony.
I've played with various filters in GIMP and have got satisfactory results with its "despeckle" filter, adjusting the "white level" and "black level" settings.
Here's an example:
If that inspires any more suggestions, it would be much appreciated.
Thanks.
Tony.
-
el_supremo
- Posts: 1015
- Joined: 2005-03-21T21:16:57-07:00
I wondered if a fx operator would work with a rule such as "If a pixel is white, change it to black if it has more than some threshold of black neighbours". I tested it by modifying the rules of the Game of Life as posted in http://redux.imagemagick.org/discussion ... php?t=7683.
The new rule gives this code:
or in windows/dos this one long command line:
White pixels have a value of one and this specific rule says that if a white pixel has more than two black neighbouring pixels then change it to black. The fx operator is slow and I had to crop just the sample numbers from the image you posted to get an image size which would complete in a reasonable time.
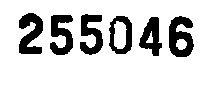
This input image:
http://members.shaw.ca/el_supremo/input.png
is changed to this:
http://members.shaw.ca/el_supremo/output.png
which appears to be identical to the acceptable result you got from GIMP.
I don't know if this ad-hoc solution will work in general but it might be a starting point.
Pete
The new rule gives this code:
Code: Select all
neighbors = "(p{i-1,j-1} + p{i,j-1} + p{i+1,j-1} + p{i-1,j} + p{i+1,j} + p{i-1,j+1} + p{i,j+1} + p{i+1,j+1})"
rules = "(u == 1 & $neighbors>6) ? 1.0 : 0.0"
convert input.png -fx "$rules" output.png
Code: Select all
convert input.png -fx "(u == 1 & (p{i-1,j-1} + p{i,j-1} + p{i+1,j-1} + p{i-1,j} + p{i+1,j} + p{i-1,j+1} + p{i,j+1} + p{i+1,j+1})>6) ? 1.0 : 0.0" output.png
This input image:
http://members.shaw.ca/el_supremo/input.png
is changed to this:
http://members.shaw.ca/el_supremo/output.png
which appears to be identical to the acceptable result you got from GIMP.
I don't know if this ad-hoc solution will work in general but it might be a starting point.
Pete
I do not know if this helps and I am not sure how to get to the next stage but some code Anthony and I used on another problem was this:
Changing the -edge value increases or decreases the line width and this will leave you with a white number with a black border around the number on a white background. This is the bit I am unsure about - all you need to do is fill the number in black again and you should have a slightly better quality number.
Code: Select all
convert input.png -edge 2 -negate -despeckle output1.png
-
tongro
Thanks very much to both of you for those tips.
El Supremo:
--------------
Wow, that's powerful syntax! I had to tweak the expression a bit to get it accepted (it wouldn't accept the == operator at all, among other things), but I still couldn't get the right output. I'm using IM 6.0.6 - might that be relevant?
Bonzo:
--------
I took your syntax and tweaked it a bit:
This produces:
Which is a good result and quite fast, so I think I'll settle with that.
-----
Thanks again.
Tony.
El Supremo:
--------------
Wow, that's powerful syntax! I had to tweak the expression a bit to get it accepted (it wouldn't accept the == operator at all, among other things), but I still couldn't get the right output. I'm using IM 6.0.6 - might that be relevant?
Bonzo:
--------
I took your syntax and tweaked it a bit:
Code: Select all
convert in.png -edge 1 -negate in.png -compose darken out.pngWhich is a good result and quite fast, so I think I'll settle with that.
-----
Thanks again.
Tony.
-
el_supremo
- Posts: 1015
- Joined: 2005-03-21T21:16:57-07:00
-
anthony

- Posts: 8883
- Joined: 2004-05-31T19:27:03-07:00
- Authentication code: 8675308
- Location: Brisbane, Australia
All the above is interesting, The edg technique can be improved by only reading the image once...
and actually is equivelent to a 'Game of Life' technique but with a neighbourhood threshold of 7 (EG any black neighbour is black.
However for a finer technique try Bluring the image then re-thresholding the image.
A threshold below 50% decreases the black areas, while larger tha 50% increases the
black areas.
At 50% it just smooths the image, removing single black and white dots, but leaves solid balck areas basically the same. This is not what you want.
At 99.9% the output will be a general 2 to 3 pixel enlargement of every black pixel in the image. probably too much thickening for your purposes, but for OCR may be better.
The 80% I used is a rough 1 pixel expandsion in areas having more than just a single isolated pixel. Eg a diagonal line of black pixels will expand. a single pixel will remove.
In other words this algorithm is simular to a 'game of life' neighbours threshold method but more general, with a controlable neighbourhood (the blur sigma) and more controllable threshold level. Note you can also adjust the blur sigma value to a fraction of a pixel for a even finer control.
I have created a summery at
http://www.cit.gu.edu.au/~anthony/graph ... _expansion
I hope to use it sometime as a IM example addition to the 'Image Transforms' section.
If anyone else like to add things they are more than welcome. I was particualrly interested in the 'game of life' reference as I must have missed it before.
Code: Select all
convert in.png \( +clone -edge 1 -negate \) -compose darken out.png
However for a finer technique try Bluring the image then re-thresholding the image.
Code: Select all
convert in.png -blur 0x1 -threshold 80% out.png
black areas.
At 50% it just smooths the image, removing single black and white dots, but leaves solid balck areas basically the same. This is not what you want.
At 99.9% the output will be a general 2 to 3 pixel enlargement of every black pixel in the image. probably too much thickening for your purposes, but for OCR may be better.
The 80% I used is a rough 1 pixel expandsion in areas having more than just a single isolated pixel. Eg a diagonal line of black pixels will expand. a single pixel will remove.
Code: Select all
convert -size 100x100 xc: -draw 'point 90,10 line 10,10 90,90' test.png
convert test.png -blur 0x1 -threshold 80% result.png
I have created a summery at
http://www.cit.gu.edu.au/~anthony/graph ... _expansion
I hope to use it sometime as a IM example addition to the 'Image Transforms' section.
If anyone else like to add things they are more than welcome. I was particualrly interested in the 'game of life' reference as I must have missed it before.
Anthony Thyssen -- Webmaster for ImageMagick Example Pages
https://imagemagick.org/Usage/
https://imagemagick.org/Usage/
-
tongro
-
tongro
-
anthony
- Posts: 8883
- Joined: 2004-05-31T19:27:03-07:00
- Authentication code: 8675308
- Location: Brisbane, Australia
Glad to be of service. Can I use the image you provided as an example in IM Examples?
Anthony Thyssen -- Webmaster for ImageMagick Example Pages
https://imagemagick.org/Usage/
https://imagemagick.org/Usage/